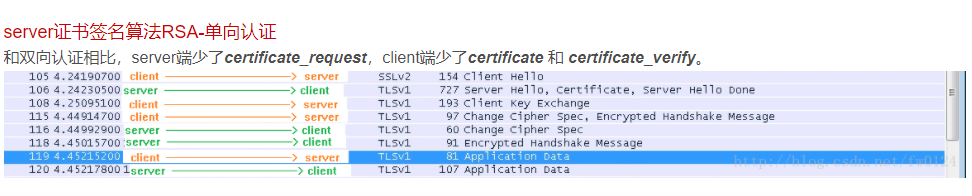
nginx配置https的双向认证
注意事项
配置双向认证,这里的common name需要都配置成不同
nginx 配置 https的双向认证
准备工作
linux环境安装openssl
生成证书步骤
1.新建一个文件夹
1 | mkdir /root/keys |
2.生成CA私钥 ca.key
1 | openssl genrsa -out ca.key 4096 |
3.生成ca的数字证书 ca.crt
1 2 3 4 5 6 7 8 9 | openssl req -new -x509 -days 3650 -key ca.key -out ca.crtCountry Name (2 letter code) [AU]:State or Province Name (full name) [Some-State]:Locality Name (eg, city) []:Organization Name (eg, company) [Internet Widgits Pty Ltd]:Organizational Unit Name (eg, section) []:Common Name (e.g. server FQDN or YOUR name) []:Email Address []:填入组织名称等信息 |
4.生成server端的私钥
1 | openssl genrsa -out server.key 4096 |
5.生成 server 端数字证书请求
1 2 3 4 5 6 7 8 9 10 11 12 13 14 | openssl req -new -key server.key -out server.csr Country Name (2 letter code) [AU]:CN State or Province Name (full name) [Some-State]:Shanghai Locality Name (eg, city) []: Organization Name (eg, company) [Internet Widgits Pty Ltd]:Sidien Test Organizational Unit Name (eg, section) []: Common Name (e.g. server FQDN or YOUR name) []:192.168.0.162 Email Address []: Please enter the following 'extra' attributes to be sent with your certificate request A challenge password []: An optional company name []:输入相关信息和密码 |
6.用 CA 私钥签发 server 的数字证书
1 | openssl x509 -req -in server.csr -CA ca.crt -CAkey ca.key -CAcreateserial -out server.crt -days 3650 |
7. 生成客户端私钥
1 | openssl genrsa -out client.key 4096 |
8. 生成客户端数字请求证书
1 2 3 4 5 6 7 8 9 10 11 12 13 14 | openssl req -new -key client.key -out client.csr Country Name (2 letter code) [AU]: State or Province Name (full name) [Some-State]: Locality Name (eg, city) []: Organization Name (eg, company) [Internet Widgits Pty Ltd]: Organizational Unit Name (eg, section) []: Common Name (e.g. server FQDN or YOUR name) []: Email Address []: Please enter the following 'extra' attributes to be sent with your certificate request A challenge password []: An optional company name []:输入相关信息和密码 |
9.用CA私钥签发数字证书:client.crt
1 | openssl x509 -req -in server.csr -CA ca.crt -CAkey ca.key -CAcreateserial -out client.crt -days 3650 |
10.生成windows安装证书程序
1 | openssl pkcs12 -export -inkey client.key -in client.crt -out client.pfx |
将client.pfx拷贝到作为客户端的机器上,安装证书,输入生成时的密码
11.配置nginx
1 2 3 4 | ssl_certificate /etc/pki/ca_linvo/server/server.crt; #server公钥路径ssl_certificate_key /etc/pki/ca_linvo/server/server.key; #server私钥路径ssl_client_certificate /etc/pki/ca_linvo/root/ca.crt; #根级证书公钥路径,用于验证各个二级clientssl_verify_client on; 开启双向认证 |
认证成功
1 | curl --cert ./client.crt --key ./client.key https://url -k -v |

开启gzip跟缓存
1 2 3 4 5 6 7 8 9 10 11 12 13 14 15 16 17 18 19 20 21 22 23 24 25 26 27 28 29 30 31 32 33 34 35 36 37 38 39 40 41 42 43 44 | gzip on; gzip_min_length 256; gzip_buffers 4 16k; gzip_http_version 1.1; gzip_vary on; gzip_comp_level 3; gzip_disable "MSIE [1-6]\."; gzip_proxied any;#这里设置需要压缩的格式 gzip_types application/atom+xml application/javascript application/json application/ld+json application/manifest+json application/rss+xml application/vnd.geo+json application/vnd.ms-fontobject application/x-font-ttf application/x-web-app-manifest+json application/xhtml+xml application/xml font/opentype image/bmp image/svg+xml image/x-icon text/cache-manifest text/css text/plain text/vcard text/vnd.rim.location.xloc text/vtt text/x-component text/x-cross-domain-policy; location / { root /root/www/web; index index.html; autoindex on; if ($request_filename ~ .*.(js|css)$) { expires 7d; } } |